Embarking on the journey of homemade bread can seem daunting, but with the right tools and a little guidance, you can transform simple ingredients into a golden, crusty masterpiece right in your own kitchen. Forget the intimidation of complex techniques; our beginner's guide to dutch oven bread recipes is designed to empower you, proving that delicious, artisanal loaves are well within your reach. The secret weapon? Your trusty Dutch oven. This kitchen workhorse creates the perfect environment for baking, giving you that coveted crisp crust and a wonderfully airy interior with minimal fuss. Get ready to fill your home with the irresistible aroma of freshly baked bread!
Why Dutch Oven Bread is a Game Changer for Beginners
The Dutch oven isn't just a pot; it's a miniature, self-steaming oven that replicates the conditions of a professional baker's oven. For new bakers, this means instant success. Here's why it's so revolutionary:
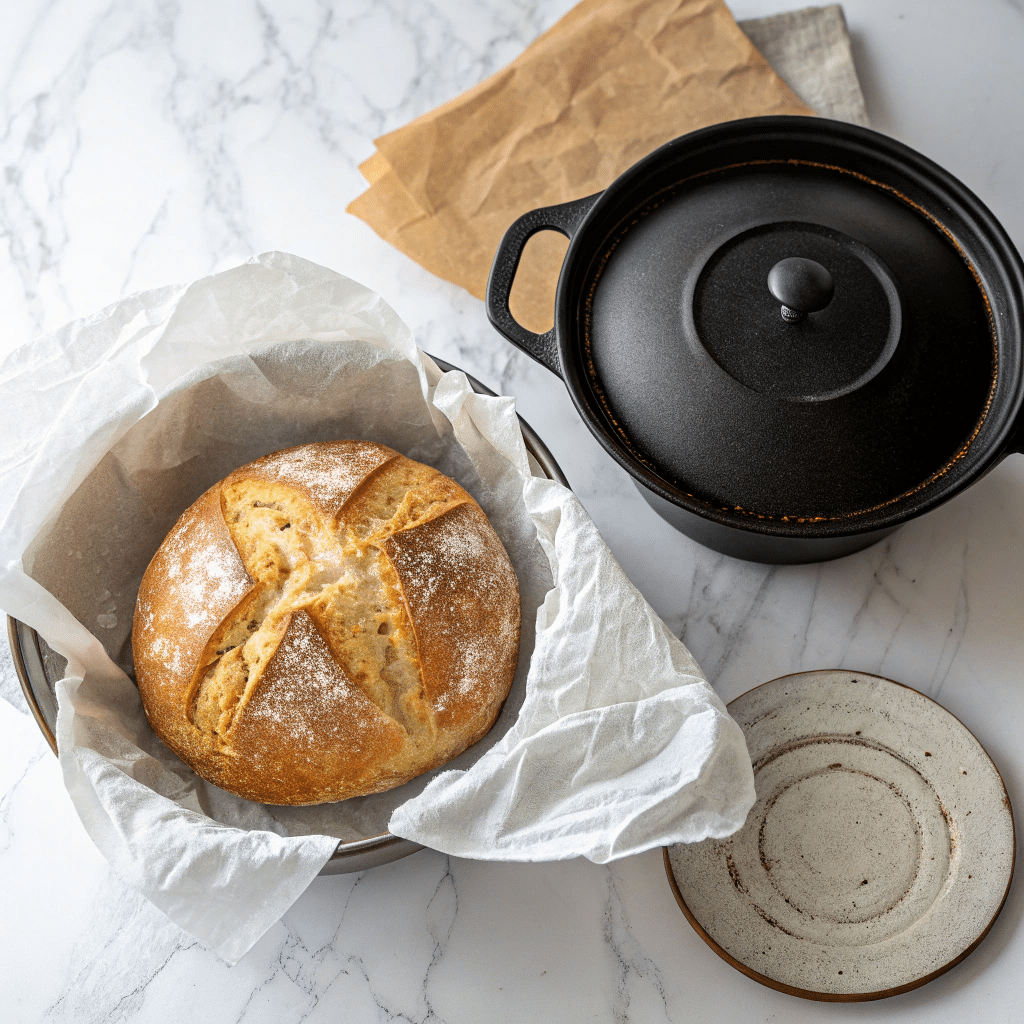
- Perfect Crust Every Time: When you preheat your Dutch oven, the intense heat helps the dough spring up rapidly. Crucially, the sealed lid traps steam released by the dough as it bakes. This steam keeps the surface of the bread moist, allowing it to expand fully before the crust sets. The result? A thin, incredibly crispy, and perfectly golden-brown crust that's the hallmark of artisanal bread. Without this steam, your crust would set too early, leading to a denser loaf with a tougher exterior.
- Even Heat Distribution: Cast iron, the material of most Dutch ovens, excels at retaining and distributing heat evenly. This prevents hot spots that can burn parts of your bread while leaving others undercooked. Every inch of your loaf bakes consistently, ensuring a uniform texture and color.
- Simplicity and Forgiveness: Many popular dutch oven bread recipes, especially the no-knead variety, require minimal hands-on time. The Dutch oven does much of the heavy lifting, allowing beginners to achieve impressive results without mastering complex kneading techniques or oven steaming methods. It's incredibly forgiving, making it the ideal starting point for anyone new to bread baking.
The Essential Ingredients for Your First Loaf
One of the beauties of bread making is its reliance on just a few basic ingredients. While there are countless variations, most easy Dutch oven bread recipes start with this core:
- Flour: All-purpose flour is perfectly fine for most beginner recipes and yields a tender crumb. For a chewier loaf with a higher rise, you might explore bread flour, which has a higher protein content.
- Yeast: This living organism is responsible for the bread's rise. Active dry yeast needs to be dissolved in warm water to activate, while instant yeast can often be mixed directly with dry ingredients.
- Water: Lukewarm water (around 105-115°F or 40-46°C) is ideal for activating yeast without killing it. The temperature is crucial!
- Salt: More than just flavor, salt controls yeast activity and strengthens the gluten structure, contributing to the bread's texture.
Beyond these basics, you can introduce other elements like a touch of sugar to feed the yeast, or enriching ingredients like olive oil or butter for added flavor and a softer crumb.
Getting Started with No-Knead Dutch Oven Bread: The Ultimate Beginner's Recipe
The no-knead method revolutionized home baking, making golden, crusty bread accessible to everyone. It requires minimal effort and delivers maximum flavor and texture. This is arguably one of the best dutch oven bread recipes to start with.
Ingredients for Classic No-Knead Bread:
- 3 cups (about 360g) all-purpose or bread flour
- 1 ¼ teaspoons salt
- ½ teaspoon active dry or instant yeast
- 1 ½ cups (360ml) lukewarm water
Step-by-Step Instructions:
- Combine Dry Ingredients: In a large bowl, whisk together the flour, salt, and yeast.
- Add Water: Pour in the lukewarm water and mix with a spoon or your hand until just combined and no dry streaks of flour remain. The dough will be shaggy and sticky – this is normal! Do not overmix. Cover the bowl tightly with plastic wrap.
- First Rise (Long and Slow): Let the dough rise at room temperature (ideally 68-72°F or 20-22°C) for 12-18 hours. This long fermentation develops incredible flavor. You'll know it's ready when the surface is dotted with bubbles and it has roughly doubled in size.
- Prepare for Shaping: Lightly flour a clean work surface. Gently scrape the dough out of the bowl onto the floured surface. Avoid deflating it too much.
- Gentle Shaping: With floured hands, gently fold the edges of the dough towards the center, forming a somewhat round ball. Don't knead it; just aim to create some surface tension. Place the dough, seam-side down, on a piece of parchment paper or in a flour-dusted proofing basket (banneton). If using parchment, you can use the paper to lift it later. Cover loosely with plastic wrap or a clean kitchen towel.
- Second Rest (Short): Let the dough rest for another 30-60 minutes while you preheat your oven and Dutch oven.
- Preheat Oven & Dutch Oven: Place your empty Dutch oven (with its lid) into your oven. Preheat the oven to 450°F (230°C) and let the Dutch oven heat for at least 30 minutes. This is crucial for achieving that crispy crust.
- Bake (Covered): Carefully remove the scorching hot Dutch oven from the oven. Using the parchment paper, carefully lift the dough and gently lower it into the hot Dutch oven. Replace the lid and bake for 30 minutes.
- Bake (Uncovered): Remove the lid and continue baking for another 15-20 minutes, or until the crust is deeply golden brown and sounds hollow when tapped.
- Cool Completely: This is perhaps the hardest step, but also one of the most important! Carefully remove the bread from the Dutch oven and transfer it to a wire rack to cool completely for at least 1-2 hours before slicing. Slicing too early traps steam, resulting in a gummy interior.
For more inspiration, including Master Easy Dutch Oven Bread: From No-Knead to Herb Infused variations, you can explore specialized guides that delve deeper into different techniques.
Elevating Your Loaf: Simple Flavor Variations for Dutch Oven Bread
Once you've mastered the basic no-knead technique, the world of dutch oven bread recipes opens up to endless possibilities. Here are a few delightful variations to inspire your next bake:
Herb-Infused Olive Oil Bread
A fragrant twist that's perfect alongside soups, salads, or just for dipping in more olive oil. The addition of olive oil enriches the dough, yielding a softer crumb and enhancing the overall flavor.
- Ingredients: Follow the basic no-knead recipe, but reduce water by about ¼ cup and add ¼ cup good quality extra virgin olive oil. Incorporate 1-2 tablespoons of finely chopped fresh herbs like rosemary, thyme, or oregano into the dry ingredients. You can also sprinkle a little extra on top before baking for visual appeal.
- Process: Mix dry ingredients, then add water and olive oil. Instead of a simple mix, you'll want to knead this dough gently for 5-7 minutes until it's smooth and elastic. Let it rise, shape, sprinkle with herbs, and bake as usual.
Sweet & Spiced Cinnamon Raisin Loaf
Perfect for breakfast or a cozy snack, this bread offers a burst of sweet flavor with every bite.
- Ingredients: To your basic no-knead recipe, add 2-3 tablespoons of granulated sugar, 1-2 teaspoons of ground cinnamon, and 1 cup of raisins.
- Process: Mix the dry ingredients (flour, yeast, salt, sugar, cinnamon), then add water. Let it rise. After the first rise, gently fold in the raisins while shaping the dough. Bake as directed.
Wholesome Whole Wheat Dutch Oven Bread
For a heartier, more nutritious loaf, incorporating whole wheat flour adds a delightful depth of flavor and texture.
- Ingredients: Replace 1-2 cups of all-purpose flour with whole wheat flour. You might need to add a touch more water as whole wheat flour absorbs more liquid.
- Process: Mix the dry ingredients, then add water to form a dough. Let it rise until doubled in size, then shape and bake. This wholesome option is fantastic on its own or paired with butter and jam.
To explore even more delicious options and Unlock Flavor: Best Dutch Oven Bread for Any Meal, check out our extensive guide that covers a spectrum of possibilities from savory to sweet.
Troubleshooting Common Dutch Oven Bread Challenges
Even with the magic of a Dutch oven, baking can sometimes present minor hurdles. Here are quick fixes for common issues:
- Crust Too Hard/Thick: Ensure you're not overbaking. Also, covering the bread immediately with a clean kitchen towel for 10-15 minutes after removing it from the oven can help soften a too-crisp crust by trapping residual steam.
- Interior Too Dense or Gummy: This often happens if the bread is under-proofed (didn't rise enough) or sliced before it has fully cooled. Always give your bread ample time to cool on a wire rack. High humidity can also contribute; try reducing the water slightly in your next batch.
- Dough Not Rising: Check your yeast's expiration date. Ensure your water temperature isn't too hot (killing the yeast) or too cold (slowing it down too much). Room temperature also plays a role; if your kitchen is cold, find a warmer spot for your dough to rise.
- Difficulty Handling Hot Dutch Oven: Always use thick oven mitts, preferably silicone or dedicated Dutch oven mitts. Use parchment paper to safely transfer dough into the hot pot. Work carefully and deliberately to avoid burns.
Baking golden, crusty Dutch oven bread is one of the most rewarding culinary experiences, especially for beginners. With minimal ingredients, straightforward techniques, and the powerful aid of your Dutch oven, you can consistently produce loaves that rival those from artisanal bakeries. Each loaf is a testament to simple ingredients transformed into something extraordinary. So, gather your flour, yeast, water, and salt, and dive into the satisfying world of homemade bread. Your kitchen (and your taste buds) will thank you!
